Default RPC endpoints in MetaMask fail more often than most people realize. Here’s how to swap them for something faster — in under a minute — and why it matters.
If you’ve ever seen MetaMask hang on “Loading…”, show the wrong balance, or fail to estimate gas on a transaction you know is valid, the problem usually isn’t MetaMask. It’s the RPC endpoint behind it.
Every wallet talks to the blockchain through a remote node. The default endpoints that ship with wallets are shared by millions of users, which means they’re often overloaded, rate-limited, or geographically far from you. Swapping in your own RPC takes about a minute and fixes most of these problems.
Here’s how to do it.
What is an RPC endpoint, exactly
An RPC endpoint is a URL — usually something like https://rpc.example.com/network — that your wallet sends JSON-RPC requests to. When you check a balance, the wallet calls eth_getBalance against that URL. When you send a transaction, it calls eth_sendRawTransaction. The endpoint forwards the call to a blockchain node and returns the result.
The URL is just routing. Your wallet doesn’t “live” on the endpoint, and the endpoint doesn’t see your private key. It only sees the public read or write request itself.
This means: you can replace the endpoint freely, anytime, with no risk to your funds. Worst case, you set a wrong URL and your wallet stops working until you switch back.
Why the default RPC is often a problem
Wallets ship with default endpoints that work out of the box, but those defaults are under constant load:
- Millions of users sharing the same URL — when traffic spikes, latency goes up for everyone
- Aggressive rate limits — to keep the service available, requests are throttled hard
- Geographic distance — if the default endpoint is in the US and you’re in Europe, every request takes a roundtrip across the Atlantic
- Limited methods — many default endpoints don’t expose
debug_*ortrace_*methods, which dApps occasionally need - No archive data — older blockchain state is often unavailable, breaking some apps
Symptoms users blame on MetaMask but are actually RPC issues:
- Balances loading slowly or showing as zero before populating
- “Internal JSON-RPC error” when sending transactions
- Gas estimation failures on transactions that should succeed
- Block explorer showing your transaction but wallet still saying “pending”
- ENS names not resolving
Swapping the RPC fixes all of these in most cases.
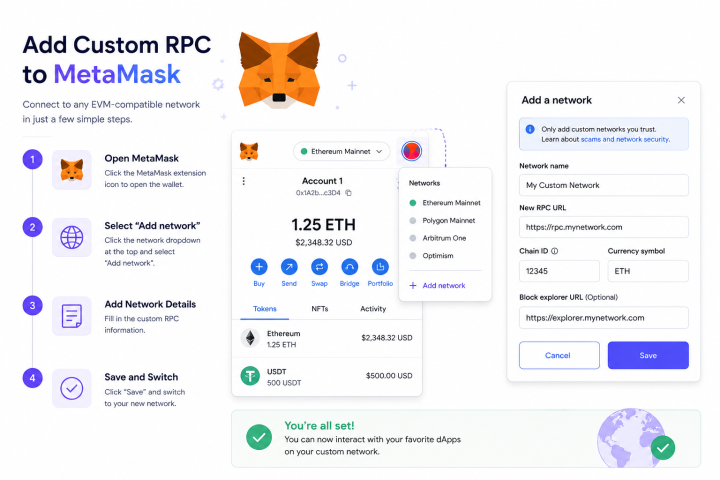
How to add a custom RPC (step by step)
The exact steps vary slightly between MetaMask versions, but the flow is the same.
On desktop (MetaMask extension)
- Open MetaMask and click your account icon in the top-right
- Click Settings
- Click Networks in the left sidebar
- Click Add a network (button at the bottom)
- Click Add a network manually (small link below the search)
- Fill in the fields:
– Network name: anything you want (e.g., “Ethereum (Fast)”)
– New RPC URL: the custom endpoint
– Chain ID: the chain’s ID (see table below)
– Currency symbol: ETH, MATIC, etc.
– Block explorer URL: optional but recommended - Click Save
On mobile (MetaMask app)
- Tap the hamburger menu (top-left)
- Tap Settings
- Tap Networks
- Tap Add network (top-right)
- Tap Custom networks tab
- Fill in the same fields as above
- Tap Add
After adding
The new network appears in your network dropdown at the top of MetaMask. Switch to it, and your wallet immediately starts using the new endpoint for everything: balances, transactions, gas estimates, contract calls.
You can keep both the default and the custom version side-by-side. If the custom one ever has issues, switch back temporarily.
Configuration for major networks
Here are the values to add for the four most-used EVM networks, using rpcfree.com as the endpoint:
Ethereum Mainnet
Network name:      Ethereum (rpcfree)
New RPC URL:       https://rpcfree.com/ethereum-rpc
Chain ID:          1
Currency symbol:   ETH
Block explorer:    https://etherscan.io
Polygon PoS
Network name:      Polygon (rpcfree)
New RPC URL:       https://rpcfree.com/polygon-rpc
Chain ID:          137
Currency symbol:   POL
Block explorer:    https://polygonscan.com
Base
Network name:      Base (rpcfree)
New RPC URL:       https://rpcfree.com/base-rpc
Chain ID:          8453
Currency symbol:   ETH
Block explorer:    https://basescan.org
Arbitrum One
Network name:      Arbitrum (rpcfree)
New RPC URL:       https://rpcfree.com/arbitrum-rpc
Chain ID:          42161
Currency symbol:   ETH
Block explorer:    https://arbiscan.io
These work for any custom RPC service — just swap the URL for whichever provider you choose.
Verifying it works
Once added, you can confirm your new endpoint is being used:
- Switch to the new network in MetaMask
- Open a dApp that uses your wallet (Uniswap, OpenSea, anything)
- The dApp should load balances and prices noticeably faster
- Send a test transaction — gas estimation should be near-instant
If something doesn’t work, double-check the Chain ID. Most custom RPC failures come from a Chain ID typo, not a bad endpoint.
Things to know before switching
A few practical realities:
Your private key never leaves your wallet. RPC providers can never see, derive, or guess your private key. They only see the requests your wallet makes, which are public information either way.
The provider sees your address and queries. When you check a balance, the RPC provider learns which address you’re checking. This is the same data anyone with a block explorer can see, but it’s worth knowing. If privacy matters to you, rotate between providers or use a privacy-focused option.
Transactions still go through the same network. A custom RPC doesn’t change which blockchain you’re on — only how you talk to it. Your transactions land in the same mempool, get included in the same blocks, and cost the same gas regardless of which RPC you use to broadcast them.
You can always switch back. If the custom RPC has an issue, switch to the default endpoint in two clicks. Nothing about your wallet changes.
ENS still works. Custom RPCs resolve ENS names just like the defaults, since ENS resolution is a contract call any working RPC supports.
How to choose a good RPC provider
When picking a custom RPC, the things that actually matter:
- Uptime — published status page or transparency about outages
- Latency — endpoint geographically close to you helps
- Archive support — needed for some dApps and indexers
- Method coverage —
debug_*andtrace_*methods if you do development - Rate limits — generous enough that normal wallet use doesn’t hit them
- No API key required for casual use (otherwise you’re back to managing credentials)
Many providers offer free tiers, and several (including rpcfree.com) skip the API key entirely for public endpoints.
When to use multiple RPCs
Some advanced users add the same network multiple times with different endpoints — for example, “Ethereum (Primary)” and “Ethereum (Backup)” — and switch between them when one is slow. This is overkill for most people, but it’s useful if you depend on your wallet for time-sensitive transactions.
For dApp developers, it’s worth setting up your apps to use multiple RPC providers and failover automatically. Libraries like viem and ethers.js support this natively.
Common mistakes to avoid
- Wrong Chain ID — this is by far the most common error. Double-check the number.
- Forgetting
https://— the URL must include the protocol prefix. - Trailing slashes — most endpoints don’t mind, but if it fails, try removing or adding the trailing slash.
- Using a testnet URL for mainnet (or vice versa) — your wallet will look like it’s working but show zero balance because it’s querying the wrong network.
- Using an endpoint that requires authentication when you didn’t paste the API key correctly — symptom is consistent 401 errors.
Quick sanity check with curl
If you want to confirm an RPC endpoint is alive before adding it to your wallet, you can test it from a terminal:
curl -X POST https://rpcfree.com/ethereum-rpc
  -H "Content-Type: application/json"
  -d '{"jsonrpc":"2.0","method":"eth_blockNumber","params":[],"id":1}'
A working endpoint returns something like:
{"jsonrpc":"2.0","id":1,"result":"0x1503a52"}
A broken endpoint returns an error or times out. If curl works, MetaMask will work.
The bottom line
Adding a custom RPC to MetaMask takes under a minute and makes your wallet noticeably more responsive. The risk is essentially zero — your funds are on the blockchain, not on the RPC endpoint, and you can switch back anytime.
If you’re using MetaMask regularly and have never customized the RPC, it’s worth doing once. Most users notice the difference immediately, especially during network congestion or high-traffic events.
The endpoints in this article — https://rpcfree.com/ethereum-rpc, /polygon-rpc, /base-rpc, /arbitrum-rpc — are free, public, and require no signup. Add them to your wallet anytime.